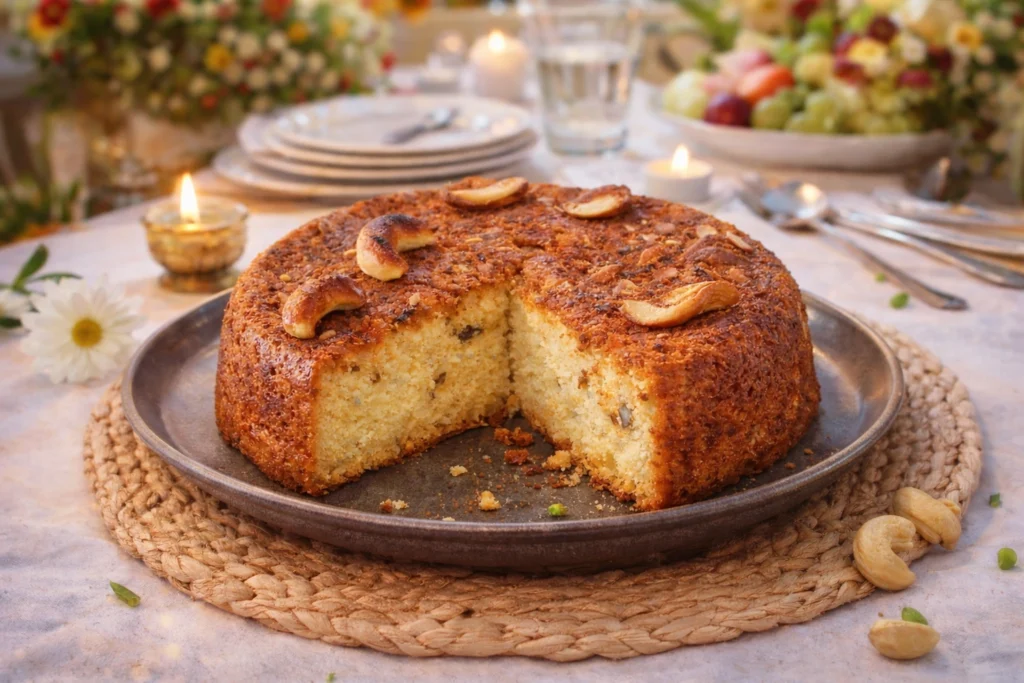
Chenna poda, literally translating to “burnt cheese,” is a beloved traditional sweet from Odisha that has captured hearts across India with its unique caramelized exterior and soft, crumbly interior. This iconic Odisha food chenna poda is often called the Indian cheesecake, and for good reason—it combines fresh cottage cheese with sugar, cardamom, and nuts to create a dessert that’s both rustic and refined. What makes this chenna poda sweet truly special is its distinctive smoky flavor achieved through slow baking, which caramelizes the sugar and creates that signature golden-brown crust.
Whether you’re celebrating a festival, hosting guests, or simply craving authentic Odisha sweet chenna poda, this homemade recipe will guide you through every step. Perfect for beginners, this easy recipe requires no fancy equipment, and you can even make chenna poda without oven using simple stovetop methods. Let’s dive into this delicious journey of creating one of Odisha’s most treasured desserts!
What is Chenna Poda?
Chenna poda is a traditional dessert originating from Odisha, particularly famous in Puri and other regions of the state. This sweet delicacy was accidentally invented by Sudarshan Sahu, a sweet maker from Dashapalla, who left his cheese mixture in an oven overnight. The result was a beautifully caramelized, aromatic dessert that became an instant sensation.
Key characteristics of this Odisha chenna poda:
- Rich, caramelized exterior with a soft interior
- Unique burnt sugar flavor
- Crumbly yet moist texture
- Aromatic cardamom and cashew notes
Ingredients for Chenna Poda Recipe
Main Ingredients
| Ingredient | Quantity | Purpose |
|---|---|---|
| Fresh Chenna (Cottage Cheese) | 500g | Main base ingredient |
| Sugar | 200g (1 cup) | Sweetener and caramelization |
| Semolina (Suji) | 2 tablespoons | Binding and texture |
| Cardamom Powder | 1 teaspoon | Aromatic flavor |
| Ghee (Clarified Butter) | 3 tablespoons | Richness and moisture |
Additional Ingredients
| Ingredient | Quantity | Purpose |
|---|---|---|
| Cashew Nuts (chopped) | 10-12 pieces | Crunch and flavor |
| Raisins | 2 tablespoons | Natural sweetness |
| Baking Powder | ¼ teaspoon | Light texture (optional) |
| Milk | 2-3 tablespoons | Moisture adjustment |
For Greasing
- 1 tablespoon ghee for the baking pan
Step-by-Step Guide to Make Chenna Poda
Step 1: Preparing the Chenna
Making fresh chenna at home:
- Boil 1 liter of full-fat milk in a heavy-bottomed pan
- Once it comes to a boil, reduce heat and add 2-3 tablespoons of lemon juice or vinegar
- Stir gently until the milk curdles completely
- Strain through a muslin cloth and rinse under cold water to remove the acidic taste
- Hang the cloth for 30-40 minutes to drain excess water
- The chenna should be moist but not dripping wet
Pro tip: For this chenna poda recipe, the chenna shouldn’t be too dry or too wet—it should hold together when pressed.
Step 2: Kneading and Mixing
- Transfer the fresh chenna to a large mixing bowl
- Mash and knead it with your palms for 8-10 minutes until smooth and creamy
- Add sugar and continue kneading until the mixture becomes slightly grainy
- Mix in semolina, cardamom powder, and 2 tablespoons of ghee
- Add chopped cashews and raisins
- If the mixture feels too dry, add 1-2 tablespoons of milk
- The final mixture should be thick, spreadable, and slightly sticky
Step 3: Preparing the Baking Pan
- Grease a 7-8 inch round or square baking pan generously with ghee
- You can also line it with parchment paper for easy removal
- Pour the chenna mixture into the pan
- Spread evenly and tap gently to remove air bubbles
- Drizzle 1 tablespoon of ghee on top for better caramelization
Baking the Chenna Poda
Oven Method:
- Preheat your oven to 180°C (350°F)
- Place the pan in the middle rack
- Bake for 45-60 minutes until the top turns golden brown
- The edges should caramelize and pull away slightly from the pan
- Insert a toothpick in the center—it should come out clean
- Let it cool completely before cutting
Stovetop Method (Chenna Poda Without Oven):
- Take a large, heavy-bottomed kadhai or deep pan
- Place a stand or inverted small bowl at the bottom
- Preheat on medium heat for 5 minutes
- Place your greased pan on the stand
- Cover with a tight-fitting lid
- Cook on low heat for 50-60 minutes
- Check after 40 minutes—the top should be brown and set
Step 5: Cooling and Serving
- Once baked, remove from oven and let it cool in the pan for 15 minutes
- Run a knife around the edges to loosen
- Invert onto a serving plate or wire rack
- Allow to cool completely for at least 2 hours
- The chenna poda sweet develops better flavor after cooling
- Cut into squares or wedges and serve
Cooking Tips for Perfect Chenna Poda
Essential tips for success:
- Use full-fat milk for making chenna to ensure richness
- Don’t over-knead the chenna; it should remain slightly grainy
- The sugar creates the caramelization, so don’t reduce it
- Low and slow baking is key to achieving the authentic burnt flavor
- Don’t open the oven frequently during baking
- The dessert firms up as it cools, so don’t worry if it seems soft initially
Ingredient Substitutes and Variations
Healthier Options
| Original Ingredient | Healthy Substitute | Result |
|---|---|---|
| Sugar | Jaggery powder or coconut sugar | More nutritious with caramel notes |
| Full-fat milk | Low-fat milk | Lighter texture |
| Ghee | Coconut oil | Dairy-free option |
| Semolina | Almond flour | Gluten-free and protein-rich |
Flavor Variations
Chocolate Chenna Poda:
- Add 2 tablespoons cocoa powder to the mixture
- Reduce sugar by 2 tablespoons
- Add chocolate chips for extra indulgence
Fruit and Nut Chenna Poda:
- Mix in dried fruits like cranberries, apricots, or dates
- Add mixed nuts like almonds and pistachios
- Adds texture and nutrition
Coconut Chenna Poda:
- Add ½ cup desiccated coconut to the mixture
- Use coconut sugar for enhanced coconut flavor
- Drizzle with coconut milk after baking
Serving Suggestions
Perfect pairings for your chenna poda Odisha:
- Serve at room temperature as an evening dessert
- Pair with masala chai or filter coffee
- Garnish with saffron strands and chopped pistachios
- Serve with a scoop of vanilla ice cream for contrast
- Add a dollop of fresh cream for richness
- Perfect for festivals like Durga Puja and Diwali
Storage Tips
Keeping your chenna poda sweet fresh:
- Store in an airtight container at room temperature for 2-3 days
- Refrigerate for up to 5-7 days
- Bring to room temperature before serving for best flavor
- Can be frozen for up to 1 month in freezer-safe containers
- Thaw overnight in the refrigerator before consuming
- Reheat slightly in the microwave for 20-30 seconds if desired
Where to Find Chenna Poda
Looking for authentic chenna poda near me? While homemade is always best, you can find this Odisha food chenna poda at:
- Specialized sweet shops in major cities
- Online platforms offering regional delicacies (chenna poda online)
- Odiya restaurants and sweet outlets
- In cities like Hyderabad (chenna poda in Hyderabad) and Vizag (chenna poda sweet in Vizag)
- Traditional sweet shops in Puri (chenna poda Puri)
Expert Notes on Chenna Poda Information
Understanding the cultural significance:
Chenna poda is not just a dessert; it’s a cultural icon of Odisha. This chenna poda Oriya recipe has been passed down through generations, with each family adding their unique touch. The beauty of this sweet lies in its imperfection—the cracks, the uneven browning, and the rustic appearance are all part of its charm.
Why the “burnt” aspect is important: The caramelization that occurs during baking creates complex flavors through the Maillard reaction. This gives chenna poda its distinctive taste that sets it apart from other Indian sweets.
Nutritional benefits:
- High in protein from cottage cheese
- Contains calcium for bone health
- Provides energy from natural sugars
- Cardamom aids digestion
- Nuts add healthy fats and minerals
Frequently Asked Questions (FAQs)
1. What makes chenna poda different from other Indian sweets?
Chenna poda is baked, not fried or soaked in syrup. Its slow baking caramelizes sugar, creating a burnt crust and cheesecake-like texture. It’s less sweet, rich, and uniquely associated with Odisha’s traditional cuisine.
2. Can I make chenna poda without an oven at home?
Yes, chenna poda can be made on a stovetop using a heavy pan or pressure cooker without the whistle. Low, steady heat allows caramelization and even cooking, closely replicating traditional village-style preparation methods.
3. How do I know when my chenna poda is perfectly cooked?
Perfect chenna poda has a dark golden-brown top, cracked surface, and slightly pulled edges. A toothpick inserted comes out clean. It feels soft when hot but firms up beautifully after cooling.
4. Why is my chenna poda too soft or too hard?
Too soft means excess moisture or undercooking; too hard indicates overbaking or dry chenna. Proper draining, balanced semolina, adequate ghee, and correct baking time ensure a moist yet sliceable texture.
5. Can I use store-bought paneer instead of fresh chenna for this recipe?
Read more
Kozhukattai Recipe: Complete Step by Step Guide to Make Traditional South Indian Dumplings