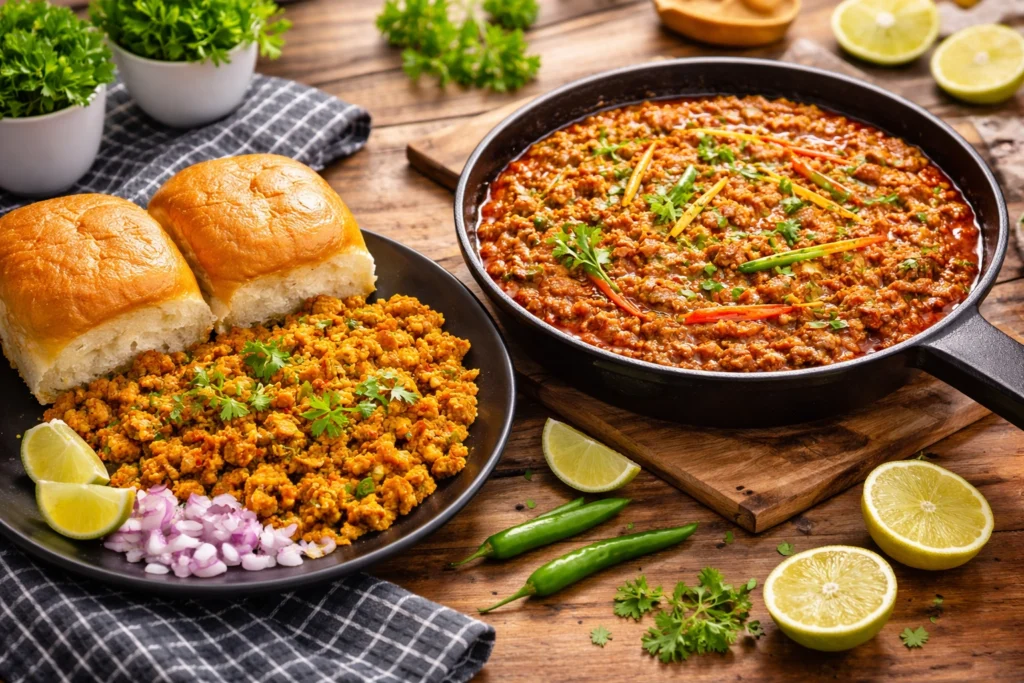
There’s something magical about the combination of spicy, flavorful minced meat and soft, buttery pav that makes kheema pav one of Mumbai’s most beloved street foods. This iconic dish has won hearts across India, from the bustling streets of Mumbai to food lovers worldwide. Whether you’re craving the authentic taste of famous kheema pav in Mumbai or want to recreate this classic at home, this comprehensive kheema pav recipe will guide you through every step. The beauty of this dish lies in its simplicity—aromatic spices, perfectly cooked kheema, and toasted pav come together to create an explosion of flavors.
While many search for “kheema pav near me” or “best kheema pav in Mumbai,” making this delicious recipe at home is easier than you think and allows you to customize it to your taste preferences. Let’s dive into this detailed guide that will help you master this Mumbai street food favorite in your own kitchen.
What is Kheema Pav?
Kheema pav is a popular Indian street food consisting of spiced minced meat (usually mutton or chicken) served with soft bread rolls called pav. This dish originated in Mumbai and has become a staple breakfast and snack item across India. The kheema is cooked with aromatic spices, onions, tomatoes, and peas, creating a rich, flavorful mixture that pairs perfectly with buttered, toasted pav.
Ingredients for Authentic Kheema Pav
For the Kheema
| Ingredient | Quantity | Notes |
|---|---|---|
| Mutton or chicken kheema (minced meat) | 500 grams | Fresh, finely minced |
| Onions (finely chopped) | 2 large | |
| Tomatoes (finely chopped) | 2 medium | |
| Green peas | 1/2 cup | Fresh or frozen |
| Ginger-garlic paste | 2 tablespoons | |
| Green chilies (chopped) | 2-3 | Adjust to taste |
| Cooking oil or ghee | 3 tablespoons | |
| Salt | To taste | |
| Water | 1 cup | Adjust as needed |
Spices
- Turmeric powder: 1/2 teaspoon
- Red chili powder: 1 teaspoon
- Coriander powder: 2 teaspoons
- Cumin powder: 1 teaspoon
- Garam masala: 1 teaspoon
- Bay leaf: 1
- Cinnamon stick: 1-inch piece
For Serving
- Pav (bread rolls): 8-10 pieces
- Butter: 3-4 tablespoons
- Fresh coriander leaves: For garnish
- Lemon wedges: For serving
- Sliced onions: For garnish
Step-by-Step Instructions to Make Kheema Pav
Step 1: Prepare the Base
Heat oil or ghee in a heavy-bottomed pan over medium heat. Add the bay leaf and cinnamon stick, letting them release their aromatic oils for about 30 seconds. Add the finely chopped onions and sauté until they turn golden brown (approximately 8-10 minutes). This caramelization adds depth to your mutton kheema pav or chicken kheema pav.
Step 2: Add Aromatics
Once the onions are golden, add ginger-garlic paste and green chilies. Sauté for 2-3 minutes until the raw smell disappears. Add the chopped tomatoes and cook until they become soft and mushy, stirring occasionally (about 5-7 minutes).
Step 3: Add Spices
Now add turmeric powder, red chili powder, coriander powder, and cumin powder. Mix well and cook the spices for 2 minutes to remove their raw taste. This step is crucial for achieving that authentic kheema pav Mumbai flavor.
Step 4: Cook the Kheema
Add the minced meat to the pan and mix thoroughly with the masala. Break up any lumps with your spatula. Cook on high heat for 5-6 minutes, stirring frequently, until the meat changes color and starts to brown.
Step 5: Simmer and Add Peas
Add salt and water to the kheema. Bring it to a boil, then reduce the heat to low. Cover and simmer for 20-25 minutes for mutton (15-20 minutes for chicken) until the meat is tender. Add green peas and garam masala in the last 5 minutes of cooking.
Step 6: Finish the Kheema
Once the meat is cooked and the gravy has thickened to your desired consistency, garnish with fresh coriander leaves. The kheema should be moist but not too watery.
Step 7: Toast the Pav
Slice the pav horizontally (not all the way through). Heat butter in a flat pan or griddle. Toast the pav on both sides until golden and crispy. This step makes all the difference in creating that authentic Mumbai kheema pav experience.
Cooking Time Overview
| Step | Time Required |
|---|---|
| Preparation | 15 minutes |
| Cooking kheema | 30-35 minutes |
| Toasting pav | 5 minutes |
| Total Time | 50-55 minutes |
Expert Cooking Tips for Perfect Kheema Pav
Meat Selection:
- For the best texture, ask your butcher for medium-ground meat, not too fine
- Fresh meat produces better results than frozen
- Mix mutton and chicken for a unique flavor profile
Achieving the Right Consistency:
- The kheema should be moist, not dry or watery
- If it’s too dry, add a little hot water
- If it’s too watery, cook uncovered on high heat to evaporate excess liquid
Spice Balance:
- Toast whole spices before grinding for enhanced flavor
- Adjust chili levels based on your preference
- Don’t skip garam masala—it adds the final flavor punch
Pav Preparation:
- Use fresh pav for the best results
- Don’t over-butter the pav or it becomes too greasy
- Toast until crispy on the outside but soft inside
Delicious Variations to Try
Veg Kheema Pav
Replace meat with:
- Soya kheema pav: Use soya granules soaked in hot water
- Finely chopped mixed vegetables (carrots, beans, cauliflower)
- Crumbled paneer or tofu
- Follow the same recipe, reducing cooking time to 15-20 minutes
Green Kheema Pav
For green kheema pav, add:
- 1 cup fresh coriander leaves
- 1/2 cup fresh mint leaves
- 2-3 green chilies (increase quantity)
- Blend these into a paste and add after the meat is cooked
- This Parsi-style version is popular in Mumbai
Regional Variations
- Kheema pav nashik style: Add more onions and less tomatoes for a sweeter taste
- Goan style: Add vinegar and increase red chili powder
- Hyderabadi style: Add fried onions and use more garam masala
Serving Suggestions
Serve your homemade kheema pav hot with:
- Fresh accompaniments: Sliced onions, lemon wedges, and green chilies
- Beverages: Hot chai, buttermilk, or cold lassi
- Side dishes: Kachumber salad or pickled onions
- Extra butter: For those who love it rich
Plating tip: Place the kheema in a bowl, arrange toasted pav on the side, and garnish with coriander, onions, and lemon wedges.
Storage and Reheating Tips
Storage Guidelines
| Storage Method | Duration | Instructions |
|---|---|---|
| Refrigerator | 3-4 days | Store in airtight container |
| Freezer | 1 month | Portion in freezer bags |
| Room temperature | Not recommended | Meat spoils quickly |
Reheating Instructions
- Stovetop: Heat in a pan with a splash of water for 5-7 minutes
- Microwave: Heat in 1-minute intervals, stirring between
- Pav: Always toast fresh before serving; don’t store toasted pav
Ingredient Substitutes and Healthy Alternatives
Meat Substitutes
- For vegetarian: Soya granules, crumbled paneer, or mixed vegetables
- For low-fat: Use chicken instead of mutton
- For protein: Add boiled chickpeas or kidney beans
Healthier Options
- Use olive oil instead of ghee
- Choose whole wheat pav or multigrain bread
- Reduce oil quantity by half
- Add more vegetables like carrots, beans, and capsicum
- Skip butter on pav or use low-fat butter
Spice Alternatives
- Substitute red chili powder with paprika for less heat
- Use black pepper instead of green chilies for mild spice
- Replace garam masala with curry powder if unavailable
Why This Recipe Works
This easy recipe for kheema pav works perfectly because:
- Proper caramelization: Golden onions create a sweet, deep base
- Layered spices: Adding spices in stages builds complex flavors
- Right meat-to-gravy ratio: Ensures moist, flavorful kheema
- Fresh aromatics: Ginger, garlic, and green chilies add brightness
- Toasted pav: Creates textural contrast with the soft kheema
Frequently Asked Questions (FAQs)
Q1: What’s the difference between mutton kheema pav and chicken kheema pav?
Mutton kheema pav has a richer, deeper flavor and needs longer cooking due to higher fat content. Chicken kheema pav is lighter, cooks faster, and is milder. Chicken is beginner-friendly, while mutton offers a more robust taste.
Q2: How do I make my kheema pav less spicy for kids?
Reduce chilies, use minimal red chili powder, and add cream or ketchup to mellow heat. Increase peas or carrots for sweetness, add mashed potato to absorb spices, skip garam masala, and serve with buttered pav and yogurt.
Q3: Can I prepare kheema in advance for a party?
Yes, kheema can be prepared up to two days in advance and refrigerated. Reheat with a little water before serving. Always toast pav fresh. For parties, set up a kheema pav station with toppings for easy serving.
Q4: What’s the secret to getting the same taste as famous kheema pav in Mumbai?
Use fresh meat with some fat, deeply caramelize onions, and don’t skip whole spices. Maintain a moist consistency, toast pav generously in butter, add a pinch of sugar, and finish with lemon juice and coriander.